

Ocean Wave Resin Art for Beginners

Ocean wave resin art captures the look of a beach from above: deep blue water, turquoise shallows, white lacy foam and golden sand. It is one of the most popular resin projects, and a coaster is the easiest place to start. This Haanz Art Guide lists the supplies you need, explains the step-by-step method for making waves, and shares tips to avoid common beginner problems.
Supplies for ocean wave resin art
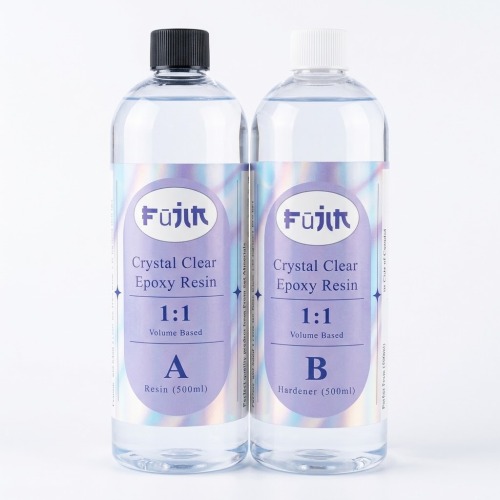
- FUJIN 1:1 Crystal Clear Epoxy Resin, 500ml + 500ml: easy 1:1 mixing by volume with a high-gloss, self-levelling finish. Enough for several coasters and layers.
- Wave Coaster Silicone Mold (9926239) or Coaster Silicone Mold (9926649): flexible, reusable coaster moulds that work with epoxy.
- Mica Powder Small Bottle: shimmering colour for the deep and shallow blues. A little goes a long way.
- Alcohol Ink, 10ml bottles: choose White for the foam and Blue or Aqua Blue for the water.
- Epoxy Mixing Cup and Epoxy Resin Tool Set: for measuring and mixing, with droppers and small spoons for colours.
- Resin Filling, 2 x Dolphins: optional ocean-themed figures to embed.
You will also need nitrile gloves, a few small cups, wooden sticks, a level table covered with plastic, and a heat gun or a hair dryer on a low setting. Find everything in Epoxy Resins, UV Resins and Silicon Molds. Prices change, so see each product page for today’s price.
Before you start
- Work in a well-ventilated room and wear gloves throughout.
- Check the mix ratio and cure times on your resin pack. Most craft epoxies are 1:1 or 2:1 by volume, so always follow your pack.
- Make sure the mould, cups and any sand or shells are clean and fully dry. Moisture can make resin cloudy.
- Level your table. Waves need the resin to settle evenly.
How to make ocean wave resin step by step
- Measure and mix. Pour equal parts of resin and hardener into a mixing cup (for a 1:1 resin). Stir slowly for the full time stated on your pack, scraping the sides and bottom.
- Split into cups. Divide the mixed resin into four small cups: deep blue, light blue or turquoise, clear (for sand), and white.
- Add colour. Add mica powder to the blue cups, a tiny pinch at a time. Mix white alcohol ink into the white cup. Keep the clear cup for a sand layer or leave it clear.
- Pour the sand area. If you are using real sand or golden mica, pour it into one side of the mould first, mixed with a little clear resin.
- Pour the water. Pour deep blue on the far side, then turquoise next to the sand. Let them touch and blend slightly.
- Pour the foam line. Pour a thin line of white resin where the turquoise meets the sand.
- Make the waves. Hold the heat gun or hair dryer on low, a short distance away, and gently push the white line towards the sand. The white spreads into lacy cells that look like foam. Stop after a few passes.
- Let it cure. Cover the mould with a box to keep dust off. Leave it to cure for the full time on the pack before demoulding.
For a deeper effect, build two or three thin layers, adding a new white foam line on each layer once the one below has set.
Tips and common mistakes
- Foam does not spread: the white may be too thick or the resin too cold. Use a thin white line and work while the resin is fresh.
- Colours turn muddy: too much blowing mixes everything together. Use short, gentle bursts.
- Bubbles: stir slowly and let mixed resin rest for a minute before pouring. A quick pass of warm air brings bubbles up.
- Sticky surface after curing: usually the ratio was off or the mix was not stirred long enough. Measure carefully every time.
- Overheating: in Sri Lanka’s heat, resin sets faster. Mix small batches and do not leave mixed resin standing in the cup.
Learn more in How to Make Resin Coasters and How to Colour Resin, and always read the Resin Safety Guide before you start.
Frequently asked questions
Can I make ocean waves with UV resin?
It is possible in very small pieces such as pendants, but epoxy is easier for waves because it stays liquid longer and has time to form the lacy foam.
Why did my white foam disappear?
The white may have been mixed too thin or blown too long, so it sank or blended into the blue. Use a slightly stronger white and fewer, gentler passes.
Do you deliver islandwide?
Yes. We deliver across Sri Lanka in 2–5 working days, with cash on delivery, card or bank transfer. You can also visit our shops in Boralesgamuwa and Horana, open every day from 9 AM to 6 PM.
Not sure what to choose? Call / WhatsApp the Haanz team on 0711 515 515 and we’ll help you choose resin, moulds and colours for your ocean wave project.
More Haanz Art Guides
 Earth Colours Explained: Yellow Ochre, Sienna and UmberRead the guide →
 How to Paint a Sea and Beach Scene in AcrylicRead the guide →
 Choosing a Watercolour Pad: A3 or A4, 160gsm to 200gsmRead the guide →
 Resin Art for Beginners in Sri Lanka: What You Need and How to StartRead the guide →
