

Resin Fillings and Stickers: What to Put Inside Resin

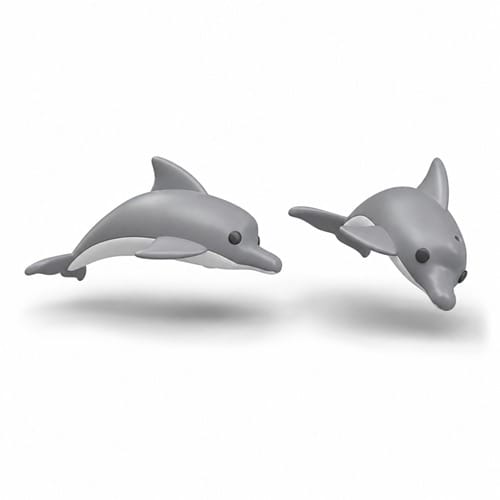
Clear resin looks lovely on its own, but resin fillings are what make a piece personal. A name in gold letters, a tiny dolphin in an ocean coaster or pressed flowers in a bookmark turn a simple pour into a gift. This Haanz Art Guide covers the fillings and stickers we stock and how to place them so they look neat and stay put.
Types of resin fillings
Letter stickers add names, initials and short words. We stock Gold Letters, Black Letter Stickers and plain Letter Stickers. They are popular for keychains, bookmarks and name plaques.
Design stickers give you a ready-made picture inside the resin. Choose from flower sticker sheets in designs A, B, C and D, or the seaside Beach Sticker for ocean-themed jewellery.
Hot stamping stickers have metallic gold designs for a luxury look. Try the Gold Sticker Blue or Gold Sticker Red sheets.
3D fillings sit inside thicker pours. The 2 x Dolphins filling makes ocean coasters and paperweights come alive.
Foil flakes add shimmer. Rose Gold Foil Paper comes as delicate flakes in a 100ml jar that you can sprinkle or press into resin.
You can also use dried flowers. See our dried flowers in resin guide. Browse everything in Other Resin Materials. Prices change, so see each product page for today’s price.
How to embed fillings without bubbles
- Mix your resin exactly as the instructions say and let it rest a minute so bubbles rise.
- Pour a thin first layer into the mould and let it thicken slightly.
- Place the sticker or filling face down (or face up for flat pieces) with tweezers or a toothpick.
- Press gently to push out any air trapped underneath.
- Pour the next layer slowly from one corner so it flows over the filling.
- Pop surface bubbles with a toothpick or a quick pass of a heat tool.
Pouring in layers stops fillings from floating to the top or sinking to one side. For thick 3D fillings such as dolphins, two or three thin layers work better than one deep pour.
Tips for each type
- Letter stickers: plan the word on a sheet of paper first so the spacing is even. Remember that whatever faces the bottom of the mould becomes the front, so check which way your letters should face.
- Flower and design stickers: place them on a cured thin layer so they don’t wrinkle.
- Foil flakes: a little goes a long way. Add flakes with tweezers rather than pouring from the jar.
- 3D fillings: make sure they are clean, dry and completely free of dust before they go in.
- Paper items: photos and printed paper can turn see-through in resin. Seal them with a thin coat of glue or sealer first and let it dry.
Project ideas
- A name keychain with gold letters and a sprinkle of rose gold foil.
- An ocean coaster with blue resin, white “waves” and two dolphins.
- A flower bookmark using a feather bookmark base and a flower sticker.
- A beach-themed pendant with the beach sticker and a little sand-coloured mica.
Our guide to colouring resin shows how to tint the background around your fillings, and Resin Problems Solved helps if a piece doesn’t come out as planned.
Frequently asked questions
Will stickers fade inside resin?
Stickers made for resin are designed to be embedded. Keep finished pieces out of strong direct sun for long periods to help colours last.
Why are my letters blurry?
The resin was probably too thin when you placed them, so they moved. Wait until the first layer has thickened slightly, then place the letters.
Can I use UV resin with fillings?
Yes. UV resin cures fast in thin layers, which makes it handy for small stickers. See our UV resin guide.
Do you deliver islandwide?
Yes. We deliver across Sri Lanka in 2–5 working days, with cash on delivery, card or bank transfer. You can also visit our shops in Boralesgamuwa and Horana, open every day from 9 AM to 6 PM.
Not sure what to choose? WhatsApp the Haanz team on 0711 515 515 and we’ll help you plan your resin project.
More Haanz Art Guides
 Polymer Clay Colour Mixing: Make Your Own ShadesRead the guide →
 Painting with Toddlers: Easy, Mess-Managed Art ActivitiesRead the guide →
 White Bristle Brushes for Oil and Acrylic PaintingRead the guide →
 Oil Pastels for Beginners: Techniques, Paper and SetsRead the guide →
