

Hand Lettering for Beginners: Brush Pens and Basic Strokes

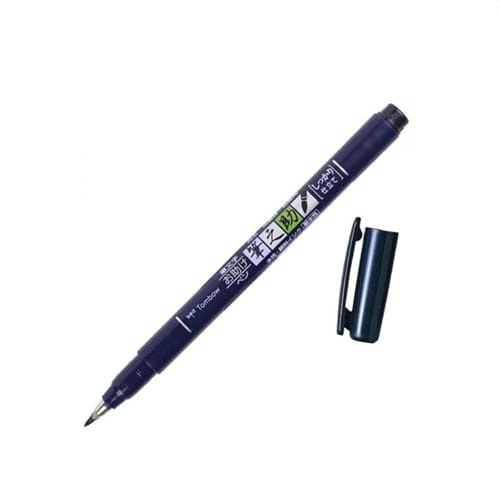
Beautiful lettering turns a birthday card, school project or journal page into something special. This guide to hand lettering for beginners explains the brush pens to start with, the one rule behind brush lettering, simple practice drills, and how to use guidelines and paper for neat, consistent letters.
What is brush lettering?
Brush lettering uses a pen with a flexible brush tip. Press lightly and you get a thin line; press harder and the tip spreads into a thick line. Changing pressure as you write creates the elegant thick-and-thin letters you see in modern calligraphy. For classic calligraphy with dip pens and nibs, see our calligraphy guide.
Brush pens for hand lettering
- Tombow Fudenosuke Brush Pen, Hard Tip: a firm, elastic tip for neat, controlled lettering; easiest for beginners and small writing.
- Tombow Fudenosuke Brush Pen, Soft Tip: a softer, more flexible tip for more expressive strokes once you are confident.
- Sakura Pigma Brush Tip: a brush pen with waterproof ink, useful if you add watercolour afterwards.
- Dual Tip Water Soluble Marker: a brush tip and a fine tip in colour; the ink can be blended with water.
For a 3D, glossy finish on headings, try a Sakura Glaze pen; see our gel pens for art guide. Prices change, so see each product page for today’s price. Browse all drawing pens and art markers.
The golden rule: thin up, thick down
In brush lettering, every upstroke is light and thin, and every downstroke is pressed and thick. Slow down: lettering is drawing letters, not writing quickly. Lift your pen between strokes rather than joining everything in one movement.
Practice drills
- Thin upstrokes: light diagonal lines going up.
- Thick downstrokes: pressed lines going down, the same angle each time.
- Overturns and underturns: the arches in n and u, thin going up, thick coming down.
- Ovals: the base of a, d, g and o, thick on the left side, thin on the right.
- Ascending and descending loops: the tall loops of l, h, g and y.
Fill a page with each drill before moving to letters. Practise for ten minutes a day.
Guidelines and paper
- Draw light pencil guidelines for the baseline, the top of small letters and the top of tall letters, and erase them when the ink is dry.
- Smooth paper protects brush tips; rough paper wears them out quickly. Smooth drawing paper or marker paper works well; see our drawing paper guide.
- Keep the same slant for all letters by adding a few light diagonal lines.
Caring for brush pens
- Hold the pen at about a 45-degree angle; holding it too upright can bend the tip.
- Cap the pen straight after use and store it flat.
- Don’t press so hard that the tip folds sideways.
- Avoid writing over rough paper, wet paint or pencil graphite, which can wear or clog the tip.
With care, a good brush pen keeps its spring for a long time, so it is worth protecting the tip from the start.
Lettering ideas
- Names and short quotes for cards.
- Headings for school notes and journals.
- Labels for gifts and jars.
- Wall art with a favourite word, framed on a shelf.
Frequently asked questions
Which brush pen should a beginner buy?
A firm, small tip such as the Fudenosuke Hard Tip is easiest to control.
Why are my letters wobbly?
Usually from writing too fast. Slow down, and move your whole arm, not just your fingers.
Can I do brush lettering with a normal pen?
Yes, with “faux calligraphy”: write the word, then thicken all the downstrokes by drawing a second line beside them and filling the gap.
Do you deliver islandwide?
Yes. We deliver across Sri Lanka in 2–5 working days, with cash on delivery, card or bank transfer. You can also visit our shops in Boralesgamuwa and Horana, open every day from 9 AM to 6 PM.
Not sure what to choose? WhatsApp the Haanz team on 0711 515 515 and we’ll help you choose brush pens for lettering.
More Haanz Art Guides
 Watercolour Pencils: How to Use Them and Which Set to BuyRead the guide →
 Detail Brushes and Fan Brushes: Fine Lines, Leaves and TextureRead the guide →
 How to Clean and Care for Paint BrushesRead the guide →
 How to Colour Resin: Mica Powder, Alcohol Ink and GlitterRead the guide →