

Polymer Clay Miniatures and Charms: Tiny Food, Animals and More

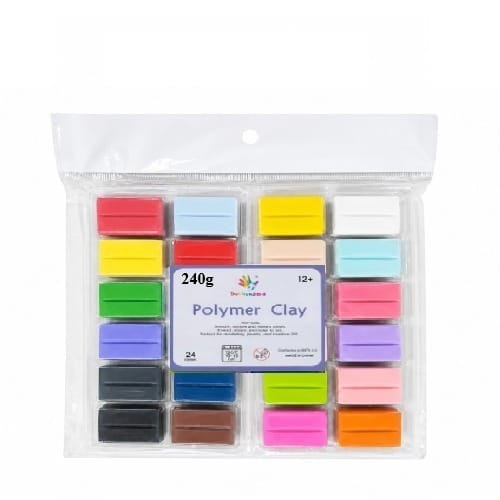
Tiny cakes, little animals, mini fruit and cute keychain charms: polymer clay miniatures are addictive to make and delightful to give. They need only small amounts of clay and a few simple tools, so they are a great next step after your first clay project. This guide covers the basic shapes, tools and finishing.
Polymer clay: what you need for miniatures
- Clay: a rainbow set such as Oven Bake Polymer Clay 24 × 10g gives plenty of colours in small amounts. Add White and Black polymer clay 20g for mixing and details, and 20g single colours for shades you use often.
- Detail tools: the Bomeijia Plastic Clay Tool Set 10 pcs has 20 tool shapes for shaping, texture and detail.
- Hardware: Gold Jump Rings, Large for keychains and bag charms, and a Crafting Plier.
- Finishing: Mont Marte Signature Gloss Clay Varnish 20ml for shiny details such as icing, fruit and eyes.
- Extras: a toothpick, a soft brush and an old toothbrush for texture.
Prices change, so see each product page for today’s price.
Learn the basic shapes
Almost every miniature is built from a few simple shapes. Practise these first:
- Ball: heads, fruit, buns and eyes.
- Snake: tails, handles, piped icing and noodles.
- Teardrop: ears, leaves, petals and beaks.
- Flat disc: biscuits, plates and pizza bases.
- Cube: cake slices, boxes and toast.
Clay charms: three easy projects
Mini doughnut
- Roll a light brown ball, flatten slightly and press a hole in the middle.
- Flatten a thinner pink disc for icing, make a hole, and lay it on top.
- Add tiny coloured snakes as sprinkles. Texture the dough with a toothbrush.
Little cat
- Roll a ball for the head and a larger teardrop for the body.
- Add two small triangle ears and a thin snake tail.
- Poke eyes with a tool, or add tiny black clay dots.
Strawberry
- Shape a red teardrop.
- Poke tiny seed holes all over with a toothpick.
- Add a small green star of leaves on top.
Turning miniatures into charms
- Before baking, push a small eye pin or a loop of wire into the top, or make a hole with a toothpick.
- After baking, add a jump ring and attach it to a keychain, zip pull or phone strap.
- Glaze shiny parts only; matte and gloss together look realistic.
Baking and finishing
- Bake on baking paper in a home oven, exactly as the clay pack directs.
- Let pieces cool fully before handling; warm clay is fragile.
- Brush on gloss varnish for icing, sauces and eyes.
- Store finished pieces in a small box with dividers.
More miniature ideas
- Tiny Sri Lankan treats such as kavum, kokis or a plate of rice and curry.
- A mini fruit basket with mangoes, bananas and rambutans.
- Pets and favourite animals as bag charms.
- Little plant pots with succulents.
- A set of mini books or school supplies for a teacher’s gift.
Tips for tiny details
- Work on a smooth tile so you can turn your piece without touching it.
- Clean your fingers often to keep colours bright.
- Use a magnifying lamp or good daylight for small work.
- Make several at once; batches are quicker and help you improve.
See our polymer clay for beginners guide and polymer clay earrings guide for more.
Frequently asked questions
Are clay miniatures suitable for children?
Older children enjoy them with adult help for baking. Small pieces are a choking hazard for young children.
Can I eat from clay miniatures?
No. Polymer clay is for decoration only and must not be used with food. Keep clay tools separate from kitchen tools.
How do I stop fingerprints?
Work with clean, cool hands, and smooth the surface gently with a fingertip or soft brush before baking.
Do you deliver islandwide?
Yes. We deliver across Sri Lanka in 2–5 working days, with cash on delivery, card or bank transfer. You can also visit our shops in Boralesgamuwa and Horana, open every day from 9 AM to 6 PM.
Not sure what to choose? WhatsApp the Haanz team on 0711 515 515 and we’ll help you choose clay and tools for miniatures.
More Haanz Art Guides
 Botanical Watercolour: How to Paint Flowers and LeavesRead the guide →
 Neon Paint and Glow Face Paint: Bright Colours for Art and PartiesRead the guide →
 Fabriano Accademia Paper Guide: GSM and Sizes ExplainedRead the guide →
 Drawing Paper Guide: Ivory, Conqueror, Sketch and Tracing PaperRead the guide →